Microsoft Bot Framework: Contextual authentication with the webchat control in SharePoint
This post was stuck in my drafts folder for some time. I was doubting to post it because Richard diZerega has found a way better way to do the same thing. But I thought why not post it. There are always lots of ways to get the same result in development. I find his way better actually because I think my approach would have security issues.
Context
A while ago I read a blog post from Stéphane Eyskens who is a Microsoft MVP about authenticating a bot with ADAL so that you could call the Microsoft Graph with the token of the user in your bot. This then could be leveraged to get for instance the information or, as he uses in his blog, get the profile picture of the user talking to the bot. There is already a GitHub project for authenticating with the bot framework called the AuthBot but this includes a pop-up and copy pasting of code. As Stéphane also points out, in an enterprise context this is not something the end users are waiting for. They have to login enough into multiple systems on a regular working day. Now while playing around with the Bot framework and the webchat control I found out that the webchat control is actually open sourced. They made the code available on GitHub. So looking at this I noticed that, while Stéphane proposes a solution that incorporates a proxy, I found an alternative way of doing this. This way is more focused on incorporating the webchat into SharePoint Online and have contextual authentication.
Start building
For starters we need to host the webchat control ourselves. This is build with ReactJS. Now don’t panic. We don’t need to start fiddling around with the code we just need to build it. So download or clone the webchat repo and build it locally. There are detailed instructions how to do this in the documentation of the repo. And because this is all just JavaScript we can take the build js and css files and incorporate them into our solution. Create a new Visual Studio solution. I find it easiest to start with the bot template. But in the end it’s just a web API with the Bot NuGet packages added. So just start with what you like the most. If you do start from the template. Don’t forget to update the NuGet packages because they are outdated in the template. Now go to dev.botframework.com and register a new bot. If you want more information on how to start creating a bot check out the great docs they provide.
Copy the JS and CSS files (botchat.js and botchat.css) you took from the webchat control that you build into this solution. Now we can host the webchat control from our own site. I’m using Azure websites for this. But hosting it locally is also no problem. Because we want to connect to the Microsoft Graph the easiest way to do this is to add the NuGet package Microsoft.Graph. Now we can start wiring up a dialog to our message controller. Change the code of the message controller to this.
await Conversation.SendAsync(activity, () => new MasterDialog());
Now we can start building the MasterDialog class
private async Task MessageReceivedAsync(IDialogContext context, IAwaitable<IMessageActivity> item)
{
  var activity = await item;
  var cli = new ConnectorClient(new Uri(activity.ServiceUrl));
  var userLogonName = activity.From.Id;
  var userToken = activity.From.Name;
  var loggedIn = "false";
  context.ConversationData.TryGetValue("loggedIn", out loggedIn);
  if (loggedIn == "false" || loggedIn == null)
    {
      //coming from website ClientCredential clientCred = new ClientCredential(\_clientId, \_secret);
      string redirectUri = "https://<yourbot>.azurewebsites.net";
      string authorityUri = "https://login.microsoftonline.com/<tenantID>;
      GraphServiceClient graphClient = new GraphServiceClient(
        new DelegateAuthenticationProvider( async (requestMessage) =
          {
            string accessToken = userToken; // Append the access token to the request.
            requestMessage.Headers.Authorization = new AuthenticationHeaderValue("bearer", accessToken);
          }));
        var userInfo = await graphClient.Me.Request().GetAsync();
        context.ConversationData.SetValue("UserLogonName", userLogonName);
        context.ConversationData.SetValue("userToken", userToken);
        context.ConversationData.SetValue("loggedIn", "true");
        await context.PostAsync("Hi " + userInfo.DisplayName);
        context.Wait(this.MessageReceivedAsync);
        return;
    }
    else
    {
          //user has gone to graph api await NextSteps(context, item);
    }
  }
As you may have already noticed we are getting the token from the activity. When we host the webchat locally we can specify a username when calling the webchat. We are going to (mis)use this to send the bearer token to the bot and get the information from the user. The only thing now left is to get the token in SharePoint build a webchat control and hook everything together. To get a Graph token in SharePoint we need to connect to Azure AD. I will be using the Implicit Grant Flow for this.
There is a great blog post series from Julie Turner on how to do this. She does a great job on explaining how to do this with a lot of background information. So I actually just took her code and adjusted it a little bit so that the webchat control is generated after we get a token back. So I would like to thank Julie for the posting this that I didn’t need to write the code myself.
Conclusion I just added this code to a page layout and we get a webchat control into our SharePoint page.
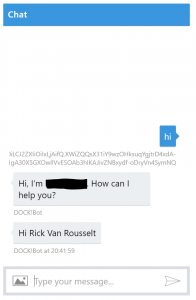
As you can see the Bot knows my name because he got it from the Graph. I didn’t post this code in my GitHub repo because it isn’t that much. If you need help setting this up then just let me know.