Setup a SharePoint development environment Part 1
There are a lot of blogs out there describing how to setup a development environment for developing SharePoint solutions and with the new version of 2013 also the development of apps. Because of the improved capabilities in Windows 8 and Hyper-V I am converting all of my previous vmware virtual machines to Hyper-V. But what about my starting virtual machine where I begin a new project with? Well instead of converting that one I’ve set out to create a new SharePoint development farm.
This farm will consist of a separate Domain Controller and a separate SQL server. This will enable me not just to set up a development server but… a development farm. This farm will consist out of several servers. This will make me use the same farm for development on SharePoint 2013 and 2010. I just need to start up the needed servers before I begin. Also a domain controller on a SharePoint server is not supported in a production environment so why should we developers try to be different :-). Just because where lazy :-)
I will cut this post into several pieces.
- Part 1: This is the part your reading. Setup the environment en global configurations
- Part 2: Installing and Configuring SQL
- Part 3: Installing SharePoint 2013
- Part 4: Configuring SharePoint 2013
- Part 5: Installing and configuring SharePoint 2010 using AutoSPInstaller
Now lets start to set up our Hyper-V configuration:
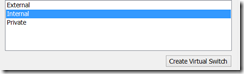
We are going to need 2 virtual switches to enable our farm. Every server will be connected internally so that they can communicate with each other on a fixed ip and so that DNS can be configured correctly.
Go in your Hyper-V settings to your virtual switch manager and create a new virtual switch.
First we’ll create the internal network.
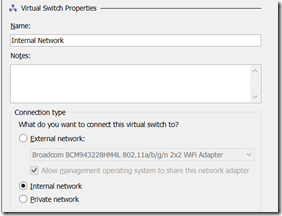
Give the internal network a name. I’ve conveniently named it “Internal Network”
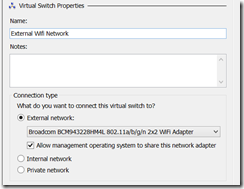
Then create the external network. I’ve linked this one to my wireless adapter.
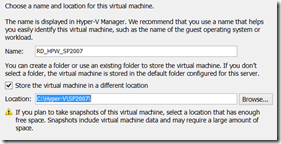
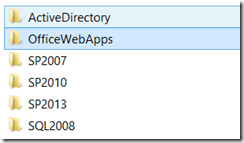
Now we can start building our virtual machines. Create a new Virtual machine and name it. Also store the vm in a different location. I’ve made a directory for every vm so when i need to copy them i can just copy what i need.
Give it a startup memory. I’ve started out with 2000 MB of memory. This will be enough to do the installation. When ready we can change this amount so that the Active Directory vm will have a little less and our SQL and SharePoint servers have a little (much :-) ) more.
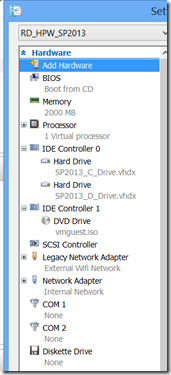
You don’t need to add a connection. We’ll add them later. Create a virtual disk to add to the Hyper-V. Also select to install an operating system later. After you created the vm don’t start it up just yet. First right click on it and select setting. Here we will add the 2 network connections and if needed other virtual disks. For the Active Directory server I’ve just used one disk. For the SharePoint and SQL servers I’ve created extra disks to separate my development files or SQL databases or logs. This is a personal choice. If you want you can just create one big disk.
The internal network can just be the already set network adapter. For the external network you should add a legacy network adapter.
Also don’t forget to attach your image to the DVD drive so that Windows Server setup will start to run when you start your virtual machine. I’ve used Windows Server 2008R2 because most of the company’s at the time i wrote this post didn’t migrate to 2012 and for development reasons i think that its best to stay as close to the production environment as possible.
How you should install Windows Server is not something i am going to cover in this post. There are a lot of blog posts out there which describe how to do this. You should do this for every server.
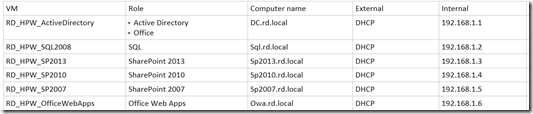
After you’ve installed Windows Server. Change the internal network to its fixed ip. I’ve created a simple table to make me remember all ip’s and names.
Also rename the network adapters to internal and external so you tell which one is which. If you don’t know which one is your internal just disconnect it in your settings so that the one that’s still online is your external connection.
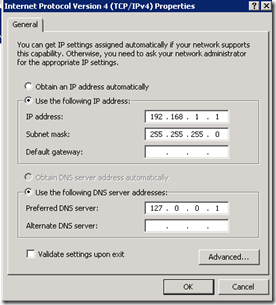
Give the Active Directory server for the internal network as prefered dns server 127.0.0.1 and for the other servers 192.168.1.1.
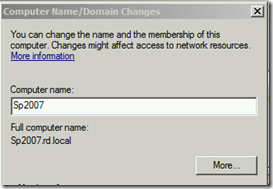
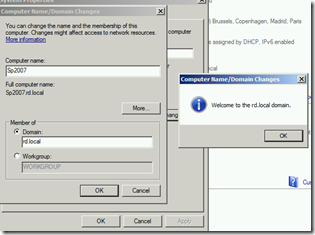
Change the name for every server according to the table. Make sure to set the Primary DNS suffix to “rd.local”. You will need to click the “More…” button to set this. Or to any domain you would like.
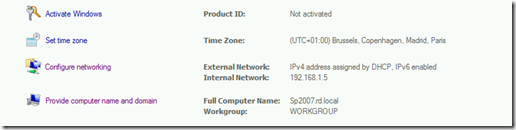
After reboot your vm should look like the example below. This is just an example. Every server will have a different name and ip of course.
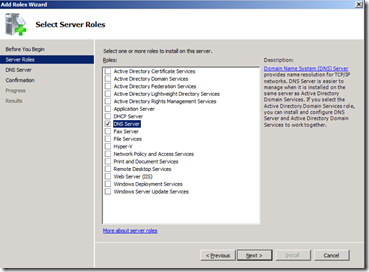
Now you should configure the DNS role on the Active Directory server.
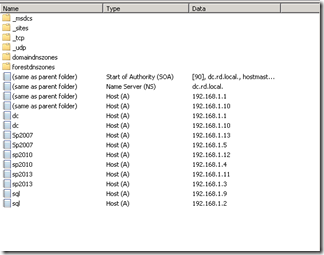
Then you need to configure a primary forward lookup zone for the RD.local domain and a primary reverse lookup zone for 192.168.1.X. Also allow both non-secure and secure dynamic updates (you can change to secure updates after the domain is fully configured). After that open a command prompt on all vm’s and run “IPCONFIG /REGISTERDNS”. Then verify in DNS if all addresses are showing up in the forward and reverse zones. If not… you’re in trouble :-)
Now the Active directory server is ready to become a Domain controller. Add the “Active Directory Domain Service’s” role to the server and run DCPROMO.EXE. Create a new forest. If you get an error message about the dynamically ip addresses just press yes. Also select the ‘Do not create the DNS delegation’ option.
After a Domain controller is configured on the active directory server and it’s rebooted you can add the other servers to the domain.
If you enable remote desktop and configure the firewall you can also RDP to the servers. This makes it a little more easier to work on the server than the connect feature in Hyper-V
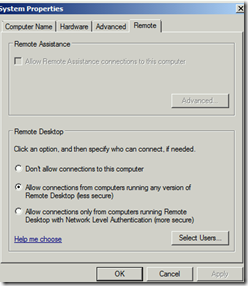
To ensure that you can RDP thru your internal network (with the fixed ip’s) you should activate also these services on your servers. This will enable you to activate network discovery which is needed for RDP.
- DNS Client
- Function Discovery Resource Publication
- SSDP Discovery
- UPnP Device Host
Now is also a good time to update all your servers.
After the updates we can additionally install the SMTP server feature to our AD machine. This will enable us to send mails from SharePoint. Because it’s not recommended to install Office on a SharePoint server where going to install it on our AD (this is also not recommended but hey you got to do something :-) ). For the receiving part of the mails you can install exchange but that’s a bit to much for our purposes so download a SMTP extender like program. I use Visendo SMTP extender but there a a lot more out there. There are a lot of blog’s which will show you on how to install the SMTP server feature, the extender and Office so I’m not going into that here.